


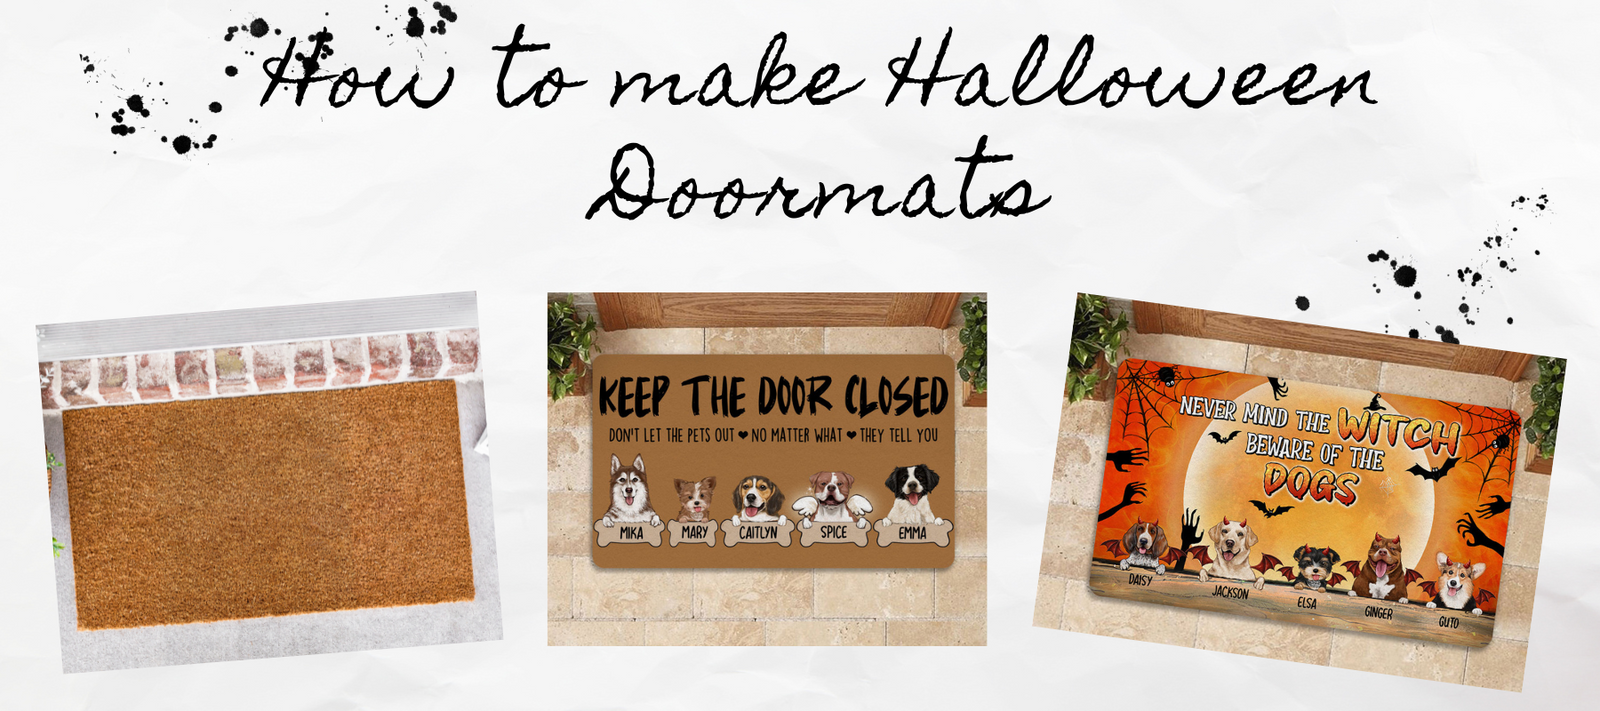

Halloween doormats are a cool way of adding the festive spirit to your house in the Halloween season. Creating your own Halloween-themed customized doormat is really easy and a fun project. It will not only make your home decor more personalized but also provide you with an opportunity to unleash your creativity.
Creating Your Own Halloween Doormat
Halloween brings with it lots of festivities and a new sense of excitement every year. You can make your Halloween this year more exciting by creating a custom Halloween doormat. It is simple, does not take too much time and does not require too many resources. Also, Do It Yourself (DIY) projects, especially DIY Halloween decorations can be really fun, and when you are embarking on such projects for festivals like Halloween, then it is all the more enjoyable. You can get creative with your design or message on the doormat and make it more interactive by adding lights or scary sounds. There are many unique Halloween decor options available online on websites likeUnifury. You can always opt for them or use them as an inspiration for your designing your personalized home decor.
For kids, Halloween is more about getting dressed in their scary costumes and going around screaming 'Trick or Treat'. While for the grown-ups, this festival provides a good break from their busy lives and allows them to try new things. One such exciting thing is decorating your house for the festive season. From flashy lights to wall hangings and fireside decors to window glasses and doormats, you can work on any house decor that will give your home the Halloween vibe. The best part about Halloween indoor decor is that all kinds of spooky ideas are accepted and appreciated. Hence we recommend creating your own Halloween doormat as it is really easy, and you don't need to be anxious, even if this is your first DIY project.

Halloween Doormat - Custom Photo
Materials And Tools Needed for Custom Halloween Doormats
The best part about creating your own styles Halloween doormat is that it does not need too many resources. All the materials and tools you need can be found in the nearby stationery and hardware store. Before you start the process, you should collect the following requisite materials:
- Blank doormat of a solid color
- Stencil
- Cutting machine
- Foam brush
- Sharpie paint pen
- Painter's tape
- Paint palette
- Variety of acrylic paint
- Spray paint
- Glitter or other additional decor items
If you wish to create many custom doormats, you can procure the items in volume accordingly. Once you are equipped with the above items, then you are ready to start working on designing your tailormade doormat for Halloween.
Instructions On Making A Halloween Welcome Mat
Excited to start working on your DIY doormat project? First, let's prepare the groundwork for the project by figuring out the doormat size. Ideally, the standard size of front door mats is either 24x36 inches or 21x33 inches. For single-door or backyard doors, the doormat size is 18x30 inches. There are many size variations available in the market; hence, you must first make sure that the base doormat you are buying is the best fit for your door. You can trim the mat, but we would not recommend that as it can get messy. Once you have figured out the doormat size, we can now get started with the project.

Common sizes for DIY Doormat Decorations
Step 1: Creating Design For Cool Doormats
You need to get your creative juices following as you brainstorm a highly innovative design for the doormat. An excellent way to start this process is to look out for inspiration. There are loads of horror movies that you can base your design on. In addition, you can browse online to look forunique Halloween decor ideas. You can always try out new ideas if you are creative and like to draw or paint.
Many good online design tools like Canva, Inkspace, and others provide you with the platform to create stunning Halloween designs. You can assemble patterns and design elements from the internet on these tools and design the perfect Halloween design you want. But do remember not to complicate the design too much, as its execution can get tricky.
Step 2: Printing the Doormat Design
Once you have finalized the doormat design, it is time to get them printed. If you have a printer at home, you can print them on regular paper. However, we would recommend that you get the printing done outside on thicker paper so that they can serve as strong stencils. Once you have finished the prints, it is time to cut them up to expose the letters of the designs. For this task, you will need a lot of precision and the right tools, like a cutting machine.
Be careful on the edges and corners, and ensure you do not make a mess of the stencil when cutting. If you are not a fan of your craft skills, then you can print additional stencils. They will serve as safety measures so that you can use another stencil in case you are unhappy with the finishing.
Step 3: Pasting Stencil on the Doormat
Once you are done with the cutting process, it is time to stick the stencil on the plain doormat. Use painter's tape to set up the stencils firmly on the doormat. If there are any wrinkles, remove them slowly. It is advisable to treat this step as a jigsaw puzzle, sticking the design on the plain doormat piece by piece. Inspect all the joints properly to ensure they form the design you envisioned.
Use the painter's tape generously so that the stencils are stuck firmly. There are chances that it can move during the painting and coating part, and this could ruin the overall design. Cover the exposed parts other than the stencil so that when you paint and coat, those parts don't get affected. If your design has letters, adjust them to be aligned. And if the design has minute artwork, then double-check that they are adequately exposed. Trim the extra painter's tape if needed.

Step 4: Paint The Stencil And Remove It Carefully
Painting the stencil is the most fun part of this process. Once the stencils are set up firmly on the doormat, you can put them on a suitable surface where you can paint comfortably. This can be on the table or even on the floor. You can first start with spray paints to cover the larger areas. You will have lesser control on this, so don't use it for minute stencil parts.
Next, you can make a quick mix of acrylic paints and use a brush to paint. This will give you the liberty of adding more colors to the design. Apply 3 to 4 coats of paint so that they last long. Once you are done applying the paint, let the doormat dry for 5 to 10 minutes. Wet colors have a chance of smudging the design.
Now it is time to move on to more delicate design elements or letters. Use sharpie paint pens or sketch pens that you are comfortable with and finish the smaller patterns and letters. Once you are done with the painting, crosscheck the entire design to ensure you are not missing out on anything. Check it from different angles, and once satisfied, leave the doormat to dry for some time.
Step 5: Decorate and Giving Finishing Touches
Remove the stencils with reasonable precaution and a lot of patience. You do not want to ruin the paint in the last step. Start from one side and keep moving to the other end. Remove all the painter's tape as well, and now you will have a clear view of the design on the doormat. There are chances that some colors might have overrun the outlines but do not be disappointed as you still have a chance to fine-tune the design.
If your design contains additional items like lights or glitters, then it is time to add them to the doormat. Be mindful not to add things that can quickly come off once the doormat is used. Apply the finishing touches wherever needed. You can also add a short message or signature so that the doormat looks totally customized.
Tips for Making Halloween Welcome Doormats
Here are some tips that can help you add a lot more creativity to your doormats:
- Doormat design can be inspired by movies or themes your children or family members like.
- When finalizing the design, go for colors contrasting to the base doormat color
- Do not go for very intricate artwork as that will be challenging to execute
- If you feel confident, you can also hand paint the doormat without extensive use of stencils.
- In the design, make sure you leave a good amount of margin on all four sides.
- Suppose you are planning to create multiple custom doormats. In that case, you can go for a design theme so that all doormats are not identical and make the home decor look more creative.
- If you do not want to create custom stencils, you can go to a nearby supply store and pick up ready-made ones.
- Always stick the sides of the stencil. As an option, you also use pins to keep the stencils firm.
- You can add additional elements like lights or sound to the doormat to make the experience more interactive.
- Try to make your message quirky and keep it short and simple.
The most important tip for creating custom doormats is to be confident with the process. If you simply follow the steps mentioned above, you will be able to make an excellent-looking doormat in no time.
How To Clean And Maintain A Doormat
Doormats are bound to get dirty as that is their job! But it is up to you how you clean and maintain them. Dirty doormats are a bad reflection on your house's hygiene. Here are some ways that can help you keep your doormat clean:
- The easiest way to clean the doormat is to shake and dust it regularly.
- If you have a vacuum cleaner, then you can use that to clean the dust off the doormat.
- Put some baking soda on the doormat and then use a brush to clean off the dirt. This method also helps to get rid of the dirty smell.
- Do not put your custom Halloween doormats in a washing machine. There is a good chance you will ruin it. For normal doormats, check whether they can be washed in a machine and only then do that.

Halloween doormats are a superb way of adding the festive spirit to your home. By customizing the doormat design, you are not only able to control the visual appeal but also take up an interesting DIY project. The entire process is not at all challenging or time-consuming. But the results are very satisfying. If you still feel unsure about creating your own doormat, you can always opt forcustom and personalized doormats available online. Halloween is a fun festival, so make sure you do not miss out on the fun of having fancy and custom decor at your home.
Reading more:


Leave a comment